Portable Mini X-ray (study purpose)
WEEK 12th: Essemble and build the full device
Safety precaucation is the main factor that i need to prepare, so that the x-ray tube has been bounded and has been provided with head sink as well as switch to make sure the machine is 100%safe
WEEK 11th: Finding the lead sheet for safety precausion
The lead sheet that has been bought specification is 0.045 mm. So that, the requirement for my device is 1cm and its need to be bounded layer by layer to make sure that safety precaution is better
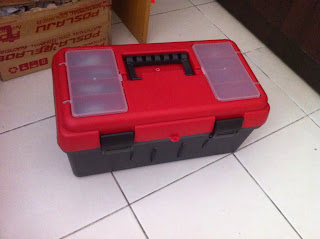
WEEK 10th: finding the housing for the device
The housing that i want to use actually is kind of "lead box" because it can increase the safety precausion but because of the price is very expensive than i just can make it by using a plastic tool box like figure above.
*try to find at another place including oversea to find the cheap lead box but still cant be found
WEEK 9th: Buy the others component
The simple and the other component that easily can buy th Jalan Pasar as shown as pic above
*the list of component has been provided inside the report
WEEK 8th: Ion ray gun, detail and its function (precaution)
This is simply a "gun" that charges nearby particles and is not confined to a vacuum tube. In any case, it could also be called a high voltage power supply.
What do you do with such a device? Well for starters you can light up certain phosphorescent or fluorescent materials by simply pulling the trigger and hitting them with the ion beam. It can light up fluorescent lights from a distance by merely shooting them with this gun. It can also supposedly charge capacitors at a distance and operate a number of electrical devices remotely. Most interesting of all, however, is that this gun is capable of inducing severe shocks from a small distance.
I bought the kit for the device from Information Unlimited and assembled it.The device generates about 100,000V and is very capable of inducing painful electric shocks and even acrid ozone gas.
The best way to ensure the most of the electricity is discharged from the end of the voltage multiplication circuit is to attach a sharp object such as a needle to the end of the safety resistor, using epoxy or some sort of adhesive, while making sure the two components are connected. This provides an excellent point for the ionization energy to transfer to the surrounding air. If you do not have a sharp point where you want the ionization to occur, it will probably take place on the capacitor leads, which are rather sharp. Make sure that when you are soldering the multiplication circuit the solder forms globules rather than the so-called icicles and the effectiveness of the ion gun will be greatly increased.
If want more power, remove the safety resistor on the end, but be careful since it hurts bad enough to get a shock with the resistor.
How does this device work? Essentially, it is supplied with a direct voltage by the 12V source (usually batteries). This is changed into an oscillating signal by an RC combination. This signal is passed through the transformer, which increases the original voltage by a factor of about 300. This higher voltage is placed across a series of diodes and high voltage capacitors, which form what is known as a voltage multiplication circuit.
The diodes prevent the capacitors from discharging in reverse and make the capacitors appear to be wired in series. As you may know, when two capacitors are in series, they act the same way as batteries do in series and their voltages simply add up. In this case, it produces an extremely high voltage. Fortunately, the capacitors are only able to hold a certain amount of energy before discharging. This prevents them from releasing a continuous output and gives them a charging time. If the output was produced only by the transformer, there would be no charging time and the output would be continuous.
R1 2.2K 1/4W Resistor
R2,7 27Ohm 1/4W Resistor
R3 220Ohm 1/4W Resistor
R4,5 100MOhm Resistor
C1 .47 MFd/50V Capacitor
C2,3 .047 to .068 MFd Capacitor
C4 1MFd 100V Capacitor
C5 .001MFd/15KV Capacitor
D1 22KV 5MA Avalanche Diodes
Q1 MJE3055 T0220 NPN GP Transistor
T1 2100:8:8
BH1 8 Cell AA Battery Holder
S1 Push Button Switch
CL1 Battery Snap Clip
HS1 Heat Sink Bracket
Subscribe to:
Comments (Atom)


